Official Manual · Getting Started

Shadowrocket Setup Guide

Import a subscription → choose Global Routing → authorize the connection → verify access. Complete the full setup once before adjusting rules or Settings.

These steps are for iPhone and iPad. Screenshots show the relevant screens, but available fields may vary by protocol. Always refer to the configuration details you already have.

Step 01

Add Server: Add a Server or Import a Subscription

Choose one import method. There is no need to add the same information twice.

Have a subscription link? Choose Subscribe

Open Shadowrocket and stay on Home. Tap Add Server near the SERVER group to open the add screen. Under Type, choose Subscribe, then enter your complete subscription link in the URL field. A subscription link retrieves server entries; it is not an ordinary service information webpage. Check the original link with your provider, and do not use an arbitrary address from your browser’s address bar.

After pasting the link, check it from beginning to end: look for spaces at either end, extra quotation marks or explanatory text, and line breaks that may have cut it off. A subscription link may contain credentials used to access your configuration. Keep it only on devices you trust, and do not include it in public screenshots, group chats, or troubleshooting records. Save when finished, return to Home, and check that the subscription group appears and contains server entries.

If you see the subscription name but no server to select, do not turn on the connection switch yet. This usually means the address was saved, but its contents have not been successfully retrieved and parsed. Check that the address is reachable on your current network, that the subscription is still valid, and that the returned content is in the expected format; then update it. Repeatedly adding the same subscription creates duplicates and will not fix an unreachable address.

Have server details? Enter each field for its Type

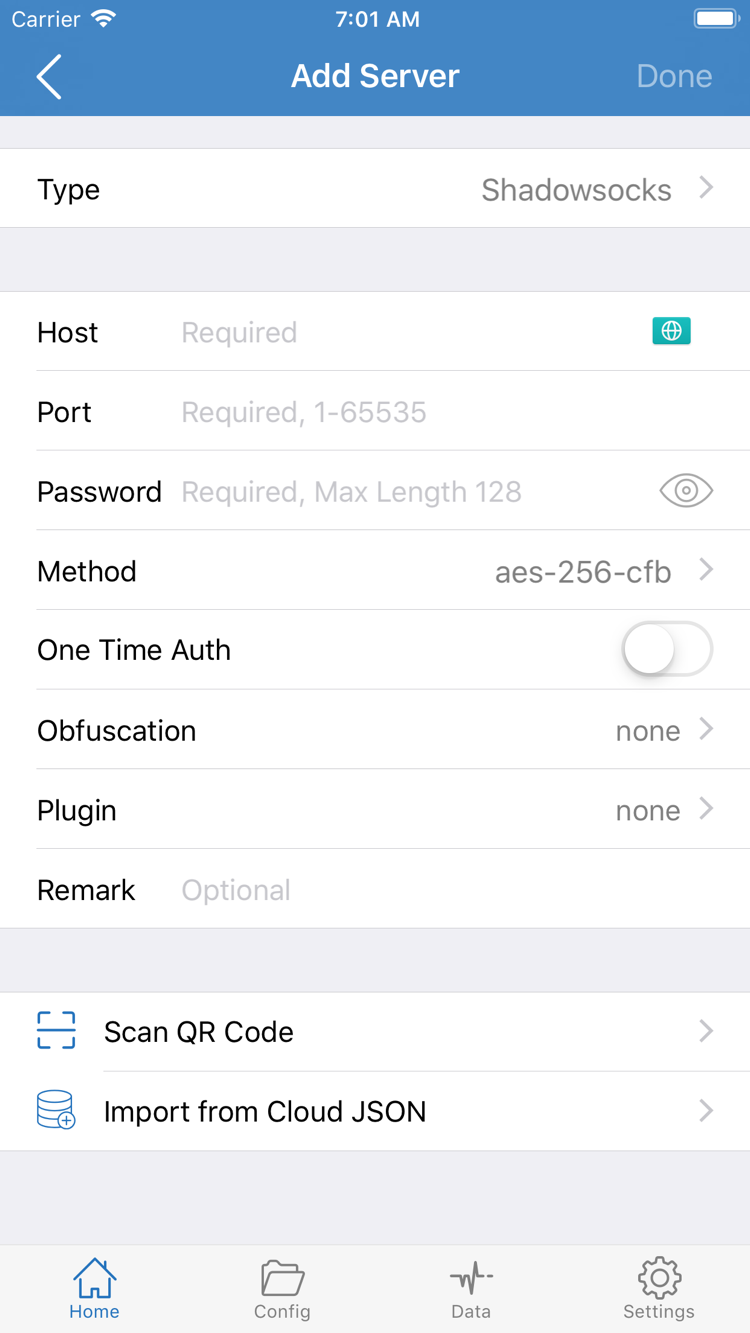
If you have details for a single server, open Add Server, choose the matching Type, and enter Host, Port, and the authentication fields required by that protocol. For the fields shown in the screenshot, Password and Method must match the server settings. Other protocols use different fields, so do not carry over settings from another protocol. Host is usually the server’s domain name or IP address; do not append a webpage path.

Port, encryption method, Password, UUID, TLS, and SNI each serve a specific purpose. Fill in only the fields required by the selected Type. If a value is missing, check the original details instead of guessing a common value. If you have a QR code, use Scan QR Code to read it, then check that the detected Type and parameters are complete. Import from Cloud JSON is for compatible files, not a general-purpose way to import any subscription link.

After saving, return to Home and check that the new entry is in the intended SERVER group. Tap the server you want to use. Its name helps you identify it but does not prove the connection works; at this point, the details have only been added and selected. Next, decide how those details will be used before connecting. If you are unfamiliar with protocol fields, see the protocol glossary. You do not need to learn every protocol during initial setup.

Shadowrocket Add Server screen showing Type, Host, Port, Password, Method, and import options
Add Server: Choose a Type, then fill in the fields using your existing details.
Step 02

Global Routing: Choose Config, Proxy, or Direct

The mode determines how requests are handled; the server entry determines the parameters used for a proxy connection.

Return to Home, tap Global Routing, and check the current selection. The three modes are Config, Proxy, and Direct. Do not confuse Config in Global Routing with the Config tab at the bottom, which manages configuration files: the former selects a routing mode, while the latter lets you inspect configuration file contents. Selecting the right server does not mean you have selected the right way to handle requests. Check both.

Config
Handles requests according to the active configuration file’s rules, applying the corresponding policy for each match.
Proxy
Routes traffic through the selected proxy. This can help test the selected server path, but does not guarantee that the destination service is available.
Direct
Routes traffic directly, without using the selected server for the usual proxy forwarding.

If you have a known-working configuration file and want to route by domain or IP, choose Config. Then open the Config tab, confirm that the active file is the one you expect, and review its Rule section. A configuration file and a subscription are different: subscriptions mainly provide server entries, while configuration files may also contain rules, DNS, and other handling settings. A successful subscription update does not mean the rules have switched to the file you want.

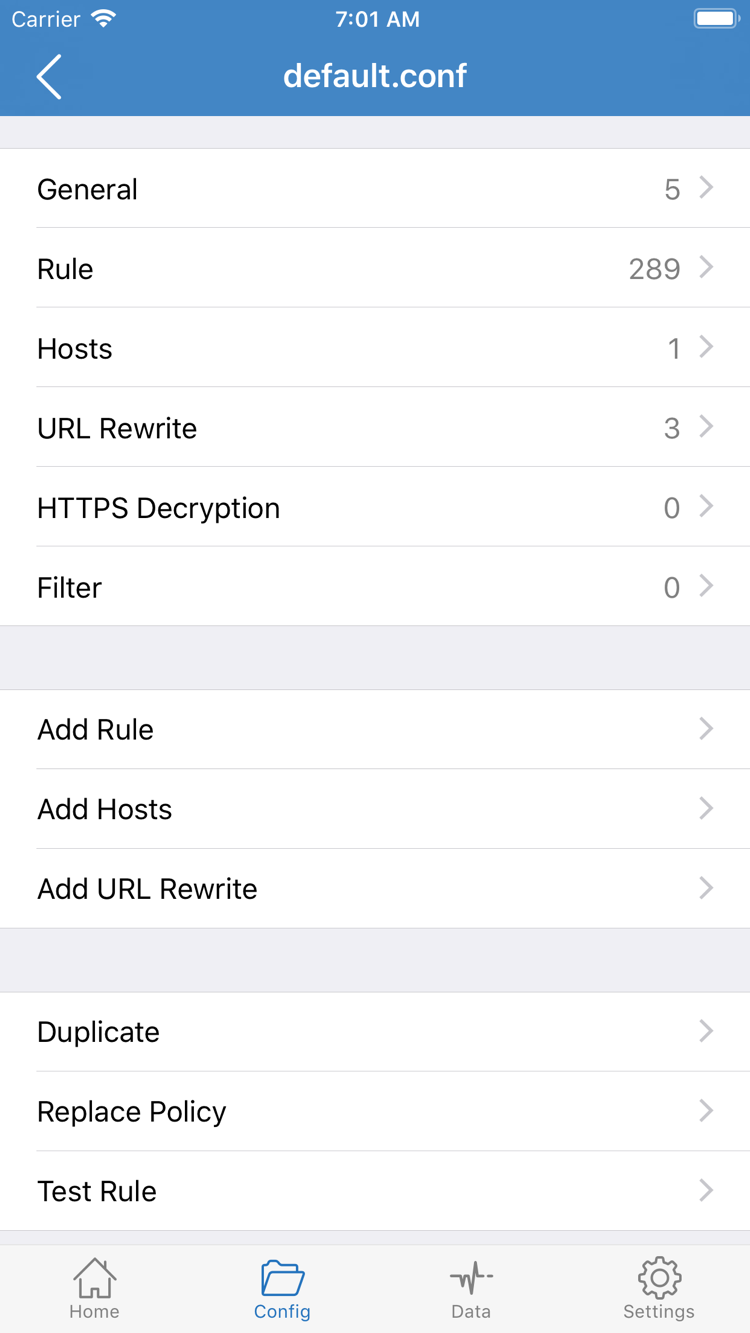
General, Rule, Hosts, URL Rewrite, and HTTPS Decryption in the screenshot are separate sections of the configuration editor. For your first connection, just confirm which file is active and what its Rule section does; you do not need to edit every section to “complete setup.” Add Rule adds a rule, but rule order and policy names affect how it works. Until you understand those relationships, do not paste in multiple blocks you found online. You do not need to enable HTTPS Decryption to verify a normal connection.

If you only want to test the server you just added, you can temporarily choose Proxy so the test focuses on the server connection path. Once it works, switch back to Config to check routing. If Direct is selected, a webpage loading does not prove that the selected proxy works. After choosing a mode, return to Home and check the Global Routing value again. For rule syntax and match order, see rule keywords and policies. For configuration file management, see Config settings explained.

Shadowrocket Config editor showing General, Rule, Hosts, URL Rewrite, HTTPS Decryption, and Add Rule
Config editor: Check rules here; choose the Global Routing mode on Home.
Step 03

Home: Connect and Authorize in iOS

Check the selected server before turning on the switch. First-time authorization is part of the system setup.

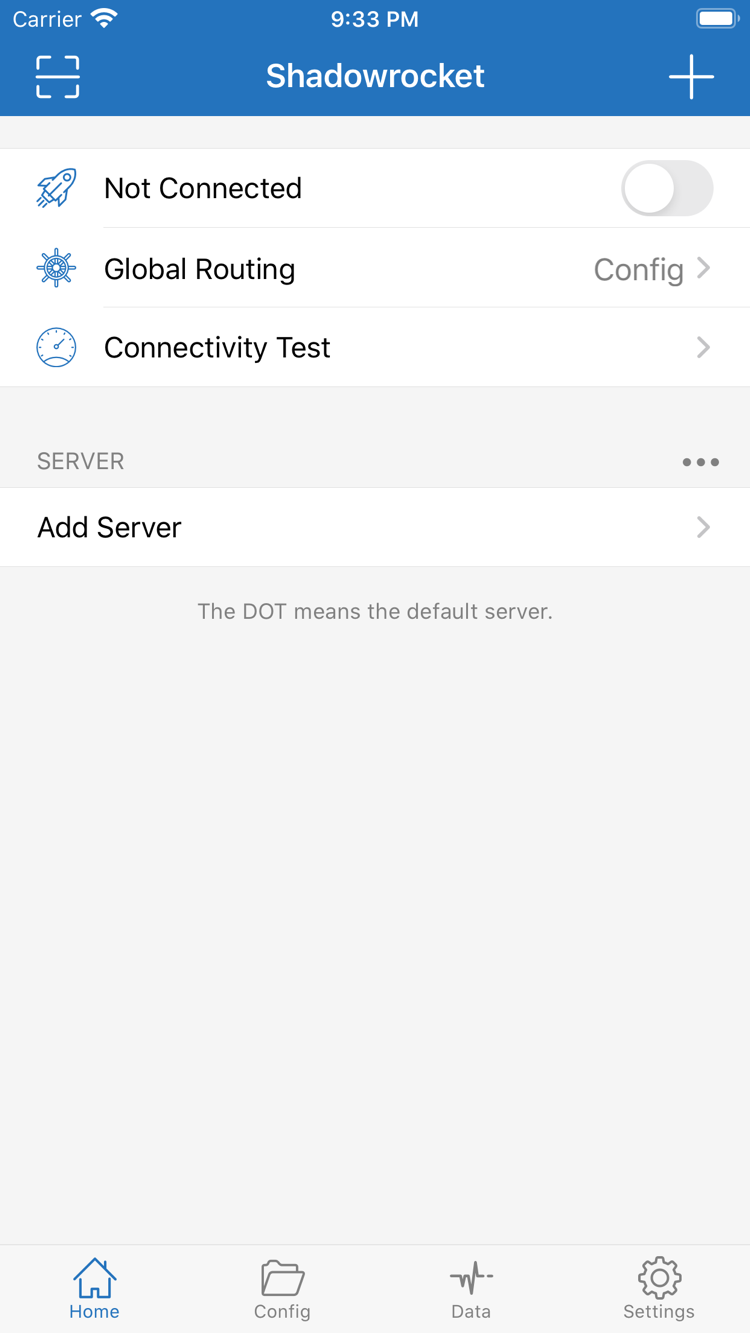
Return to Home. Before connecting, check two things: Is the server selected in SERVER the one you want to test? Is Global Routing still set to the mode you chose in the previous step? If you just updated a subscription, the entry name or group may have changed. Check the selection again instead of relying on what you remember from before the update. For the first test, stick with one known server. Avoid switching repeatedly while testing, so you can relate the result to specific parameters.

Tap the connection switch at the top of Home. When disconnected, the top of the screen shows Not Connected. The first time you connect, iOS may ask permission to let Shadowrocket add a VPN configuration. This authorization is required for the app to establish a system network extension connection. Confirm that the prompt follows the action you just took, then allow it and complete any verification required by your device. This verifies device authorization; it is not asking for the server Password.

After authorization, return to Shadowrocket and check that the switch and status remain connected. If the switch turns off immediately, first confirm that system authorization is complete, then troubleshoot the connection as described below. Do not repeatedly delete the subscription without evidence that it is the cause. If the system VPN indicator appears, continue to the next test: it shows the system connection status, but does not prove that every server is reachable or that every webpage is being handled by the intended policy.

If you need to change server parameters or a configuration file while connected, first identify which layer the change affects. For easier comparison, disconnect, make and save the change, then reconnect and test the same destination. When you are done, disconnect using the switch at the top of Home. If the connection starts again automatically, check whether On Demand is enabled; see On Demand settings. An automatic connection trigger does not mean the switch action failed to save.

Shadowrocket Home screen showing the Not Connected switch, Global Routing, Connectivity Test, and SERVER group
Home: The connection switch, Global Routing, and Connectivity Test are the main tools for initial verification.
Step 04

Connectivity Test: Verify the Connection

Check the test result, real-world access, and rule routing separately.

Check the test result first

Tap Connectivity Test on Home and wait for the result. The test method affects what the result means; check the method in Settings under Test Method. A test value only shows that a response was received under those test conditions. It does not prove that every protocol, destination, or app is working.

If the test fails, keep the current server and mode, and note which network you are using. Do not delete the entire configuration based on one timeout, or assume that a lower value necessarily means a connection will work better in practice. See Ping and test settings for more about test methods.

Then test a real request

Open the website or app you actually want to use and make a new request. Check whether it finishes loading. Whenever possible, test with a fresh request instead of relying on a cached page; refresh or reopen the destination if needed. Success with one destination only confirms that it is currently available, not that other requests work.

Then return to the app and use the active mode, configuration, and available connection records to determine the route. With Config selected, a request may match a Direct policy. Success with Proxy selected does not prove that the rules in Config are correct.

Verification should establish a traceable sequence: which server is selected, which Global Routing mode is active, whether the test responds, whether the destination is reachable, and which policy should handle that request. If you have confirmed only one of these, gather the rest before changing DNS or adding rules. If you need to review records, keep only the domain, time, and error type needed for troubleshooting. Remove subscription links, server credentials, and other personal information before sharing.

If some destinations work and others fail with Config selected, temporarily switch to Proxy and retry the same destination. If the result changes with the mode, check the configuration file and matching policy first. If both modes fail, check the server, current network, and destination. This comparison helps narrow down the cause; it is not a recommendation to make a permanent change. Restore your original mode when testing is complete so you do not mistake a temporary troubleshooting setting for your everyday setup.

Step 05

Settings: Troubleshoot One Layer at a Time

Change one setting at a time and retest the same destination. Do not change the server, rules, and DNS all at once.

No entries after import? Check the subscription content

Return to the subscription settings opened from Add Server and confirm that Type is Subscribe and the URL is complete. Make sure the subscription is still valid and returns parseable configuration content, not a login page, information page, or error message. If the original link has changed, update it using valid details from your existing service provider. At this stage, the problem occurs before server details are retrieved, so changing Global Routing or DNS is usually not the first step.

An entry is present, but the connection fails? Check the server details

Open the selected entry for editing and compare Type, Host, and Port with the original details. Then check the authentication and transport fields. Look for missing characters, the wrong protocol, a port intended for another purpose, or TLS or SNI values that do not match the provided details. Do not use Allow Insecure as a substitute for checking the certificate and hostname. If you see a related error, first confirm the server information and device time are correct.

If the same entry keeps failing on your current network, test it on another network you are authorized to use, leaving all other parameters unchanged. This helps distinguish an issue limited to one network from one that occurs in every test environment, but the result alone cannot identify the cause. If you need to check the server status, report the relevant error details to your existing service provider without including full credentials.

The switch will not stay on? Check authorization and automatic connection

If the connection switch turns off as soon as you turn it on, first confirm that system VPN authorization is complete. Then check whether another VPN connection is active in the system. If the connection comes back after you manually disconnect, open Settings and check On Demand. You can temporarily disable configured on-demand triggers while troubleshooting and control the connection manually. Note the original setting and restore it after testing. For conditions and trigger behavior, see On Demand reference.

Connected, but access is unreliable? Check rules and DNS separately

First, compare Config and Proxy as described in the previous step. If the issue occurs only with Config, open Config and check the active file, Rule order, and policy references. A broad rule near the top may match before a more specific rule below it. FINAL handles requests that did not match an earlier rule. Adding a rule does not guarantee that a request will use it.

If you see a domain resolution error, check the DNS settings in the active configuration and whether they are reachable. DNS determines how a domain resolves to an address; server settings determine how the connection is established. They are not interchangeable. Do not paste in multiple DNS settings from unknown sources. Keep the original values and retest the same domain after each change. For more about how the settings work together, see DNS settings explained.

Need more information? Use Diagnostics

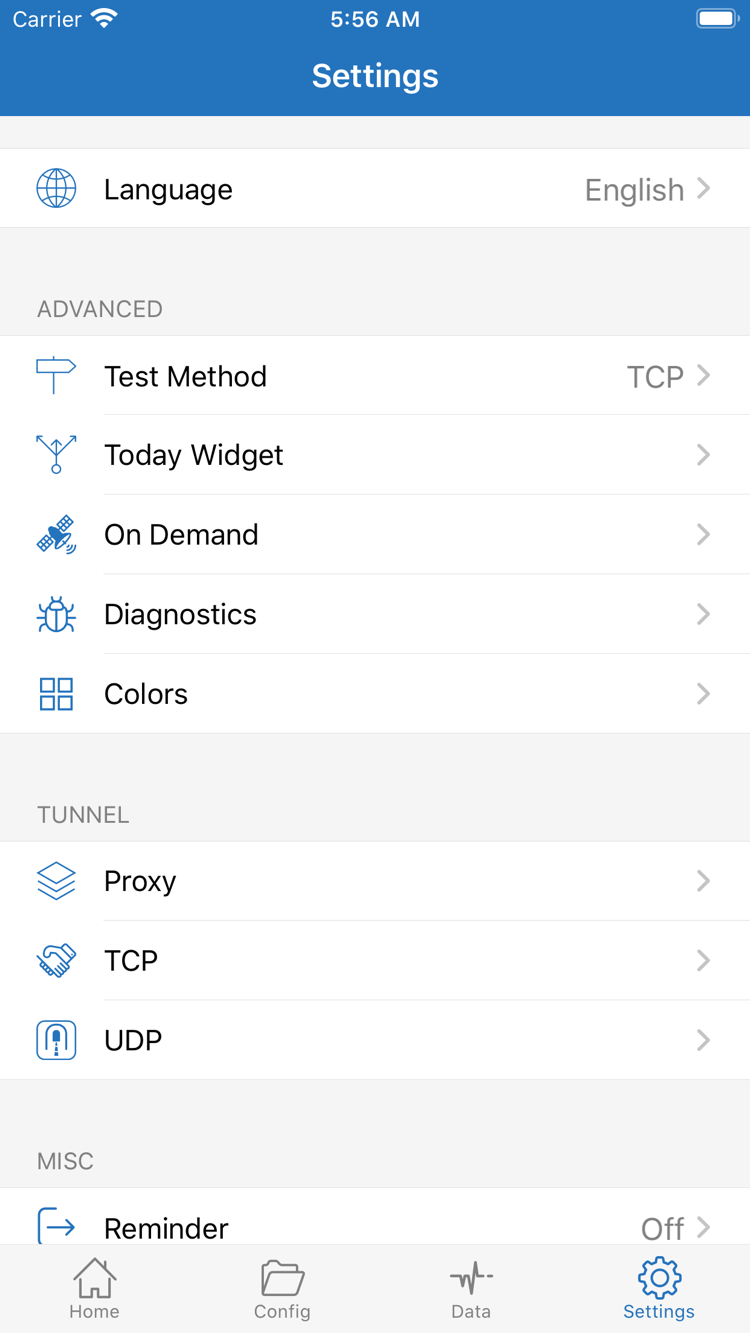
In Settings, open the relevant Diagnostics tools and check Test Method to confirm the test conditions. Record the current mode, whether you are connected, the affected destination, and the steps that led to the issue. This is more useful than simply saying “it doesn’t work.” Today Widget, Proxy, TCP, and UDP in the screenshot cover different settings; do not change them all to troubleshoot one issue. Check the relevant section only when you know a particular setting may be related to the problem.

You should now be able to tell whether the issue is an import that did not complete, a server that cannot connect, a system connection that was not established, or a rules or DNS problem affecting a specific request. If you are still unsure, keep a minimal, repeatable set of steps and continue by symptom in Frequently Asked Questions. For initial setup, you only need one verifiable connection path. Once it is stable, review Widget, iCloud sync, and more detailed adjustments in Settings reference.
Shadowrocket Settings screen showing Language, Test Method, Today Widget, On Demand, Diagnostics, Proxy, TCP, and UDP
Settings: During troubleshooting, focus on Test Method, On Demand, and Diagnostics; check other options as needed.